Wednesday, June 27, 2012

Bean and Nut Loaf

Cooking through the Vegetarian Mother's Cookbook continued. 

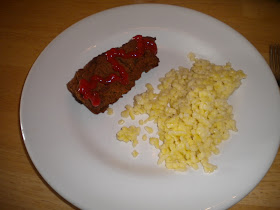
Today's meal was Bean and Nut Loaf.  The sound of it is quite atrocious to me, however in my determination to cook through this cookbook, I'm trying everything. Guess what? Discipline pays off!

This mock meat loaf is made from walnuts, pinto beans, carrots, and flax seeds among other things.  It "dries" in the oven to form a nice crusty exterior and a soft, gooey interior.

I served it with ketchup, per Cathe Olson's recommendation and I think the ketchup was necessary to make this loaf really taste like meat loaf. 

Spaetzle, (a German egg noodle) sauteed in butter and salted, was our side dish .  The combination was very satisfying  - a good comfort food meal :)

And, let me just say, I love having fake meat that I prepared in a few minutes in the food processor rather than something from the frozen food section of the grocery store that is full of wheat gluten and soy protein as well as preservatives.  And, yes, Spaetzle does contain gluten, but it's nice that it's only in our side dish and not in the main dish as well. 

Cooking the musical fruit!

Molly

Monday, June 25, 2012

Makeover Mondays: Baby Swing!

Welcome, once again to Makeover Mondays where I focus on upcycling.  Today I want to share one of my favorite makeovers...drum roll please...an upcycled baby swing.

We were so generously given a baby swing from some dear friends when we had our first daughter.  They had purchased it for their first son who is at least 13 now...so as you can imagine it's slightly outdated.  It works fantastic and being the frugal person that I am, I didn't want to buy a new one. 

As I was thumbing through some pins on pinterest, I found what is now one of my all time favorite blogs, Make It - Love It.  On this site I found an amazingly detailed tutorial on recovering a car seat and a high chair.  I used the concept to recover my swing - I actually did a car seat and am in process of recovering my high chair as well.  It looks so amazingly better and it was super simple...much more simple than it looks.  My swing is now much more up-to-date and girly! 

Check out these before pictures


This is the original cover for the swing.


Here's a picture of my first daughter in the swing 4 1/2 years ago.

And, after 2 naps, the swing was transformed into this...

 This is my second daughter in the swing a month or two ago. 

And the sweet girl happens to be sleeping in the swing (her favorite place on the planet) right now so I can't get a great picture of the swing until later...I'll post a better picture of the finished product when the swing is available for a photo-op :)


Making the world prettier one swing at a time,

Molly


Wednesday, June 20, 2012

What Do You Do with Your Kid(s) Artwork?

I have piles and piles of my daughter's artwork that I hate to throw away, but I'm not sure what to do with. There are a few art projects that I have actually done something with and I'm so glad I did. 

I made a binder with all the art projects she did for preschool this year (we homeschool, but you can do this with what she/he bring home too - I included some of her Sunday school pictures too).  I just slipped the projects into sheet protectors and into a 3 ring binder.  This works great for things made on an 8 1/2x11 sheet or smaller.  Construction paper (I discovered) is too large for a binder.  So, all her construction paper projects are stuck in the folder part in the back.

Once I realized construction paper is too large for a binder and that it fades over time, I decided to buy a large package of scrapbook paper at Hobby Lobby.  It's almost as big as a ream of copy paper and it's about $10 (so a little more than construction paper) but it's also more like card stock weight. Nice thing is it doesn't fade and fits nicely into the binder - so it's worth the extra few dollars to me. 

Some of the special pieces I framed.  We have two pieces hanging on my daughter's bedroom wall.  They are her first painting and her second drawing (first drawing went to the grandparents).  I love seeing these all the time.  It's a reminder of how far she's come in her artistic ability and it adds color to her walls. 


If they weren't her "firsts" I would probably change them out every month or so to change it up, but since these are firsts, they are staying. 

A friend of mine staples or tapes large pieces of construction paper together and tapes the projects into her "books" so that she can fit all different sizes of artwork into the books. She said her daughter enjoys going through her books and looking at all her artwork. 

What do you do?  I'd love to hear your comments and get a few more ideas...I currently have a basket on a bookshelf and a drawer in a dresser packed and these projects need an organized, new home :)

Busting at the Seams with Art,
Molly

Monday, June 18, 2012

Makeover Mondays: Painted Vases

This project was definitely inspired by Pinterest.  I found this great tutorial on painting vases here.  This is especially great if you want to use the vases for flowers or want to wash them. 

I needed something for my fireplace mantel and have no plans to use them for flowers or to wash them (besides a quick dust or rinse).  I am also on a tight budget and this project fit the budget.  I purchased some of the vases at the Dollar Tree and some were vases I already had.  Rather than go through all the steps in the tutorial on Sugar and Charm I simply poured a small amount of paint (which I had leftover from other projects) into each vase and rolled them until they were coated (on the inside) with paint.  I poured the excess paint back into the paint can and then set them upright to dry. 

As the vases dried, some paint pooled at the bottom, but it's not very noticable and since I'm not using them for anything other than decorations I'm okay with think paint on the bottom.  If you want to use your vases for flowers, don't paint them the way I did, look at the tutorial on Sugar and Charm. 


So quick and easy!


Paint it new!

Molly

Wednesday, June 13, 2012

Cooking Through Vegetarian Mother's Cookbook: Tamale Pie

A while back I was doing a 60-day-no-refined-sugars fast.  I can't even remember why I did it.  But, I do remember the rule was that I could only eat products with no sugar or unrefined sugars such as honey, molasses, pure maple syrup, and agave nectar.  During the fast, I went to the library and checked out a cookbook called The Vegetarian Mother's Cookbook, by Cathe Olson.  I tried her desserts because they were made without refined sugars and I was craving sweets, and to my surprise, they were delicious! 

I wanted to renew the book, but it was reserved by someone else so I had to return it.  I finally bought the book a few weeks ago and decided to cook my way through the cookbook and post pictures online.  This cookbook is fantastic, but there are no pictures and I'm a fan of picture cookbooks.  So, this will serve two purposes: 1. Pictures to go along with the recipes (for me for the future) and anyone else that may be interested in the cookbook and 2. To encourage me to actually try things that might not sound so great just reading over them. 

*Edit* I just found Cathe Olson's blog where she shares pictures and some of the recipes from this cookbook along with other recipes.  If you are looking for good vegetarian or healthy recipes, check out her blog. 
Don't expect fancy pictures. I'm a mother of 2, homeschooling one and babysitting another until 6 in the evening, so by the time I get dinner on the table everyone is ready to dig in and there is little time (or patience) for me to take pictures.  These are just snap shots. 

So, I've made two meals from the cookbook so far.  Both were main dish recipes and then I made dessert to go along with it.  Guess how many pictures I have of the four dishes I've made so far?  One. Yup, that's right.  I only remembered to take pictures of the main dish of one of the meals I made.  So, these posts may be few and far between, but I will cook through the book, it just might take 5 years to get pictures of everything :) 

I know, the suspense is just building :)  ha! Here is the first dinner I made out of this book. 

Introducing the Tamale Pie (on page 202).


I will not be sharing the recipes on this blog as I want to promote the cookbook, not steal her recipes.  All I will say is her recipes are simple, delicious, and healthy.  I like a lot of flavor and so far her recipes have been pretty full flavor which I wasn't expecting because most vegetarian cookbooks I've tried are so focused on being healthy that they compromise flavor.  This is not the case with The Vegetarian Mother's Cookbook and the precise reason I am so thrilled to be cooking through it.


Eat yourself healthy!
Molly

Monday, June 11, 2012

Makeover Monday: Plastic Bag Container & Snack Container (Recycled)

Do you ever feel like you have plastic bags coming out of your ears?  I certainly do.  We use reusable shopping bags but even so, there are times we forget them and those little plastic bags accumulate quickly.  I use them for our small trash cans in the bedrooms and bathroom.  The only issue is that they are so bulky that I keep them in the basement which isn't very conducive to actually getting the bags in the trash cans before something gets thrown in them. 

In addition, I go through a lot of creamer and recycle the containers, but I wondered how I might reuse them. 

I saw something similar to this on Pinterest and thought I'd give it a try.  I wanted to make them pretty, so I used an idea from Little Birdie Secrets when she made labels for soap dispensers. 

Here are the original containers...


I took the label off the coffee creamer container and then printed up some new labels.


I attached the labels with mailing tape to make the labels waterproof for washing. I like that the snack container has my girls' names on it so that I can bring it to the nursery at church and they won't wonder who it belongs to.


I like the black and white with the red Folgers can.


Cut a + in the top of the coffee can.


Here's the +


And, see how bulky these bags are?


Guess what, all neatly stored in this container.  Cute and Space Saving...win, win. 


Now I have bags right in the bathroom vanity so it's super quick and easy to change the "trash bag" on trash days :)

Another use for the creamer container, wash one out and use it to store homemade salad dressing - nice easy pour spout. 

Note: I just emptied a Tum's container (actually my husband did - anyone know how to cure heartburn naturally?) and decided it would make a great snack container as well.  It's a bit smaller in size, so it's a good snack size and it has a larger mouth so the square pretzels that I buy will pour out of the lid easily.


Reusing Containers!

Molly

Wednesday, June 6, 2012

Bubble Wrap Art

This is definitely a "pinspiration." I saw this on pinterest and had to try it out myself.  We did this with my 4 1/2 year old daughter and the 2 year old I babysit.  Both were able to do it and both had a great time.  It was fun making multiple prints and also trying different looks as we dragged the bubble wrap across the paper.


To do your own Bubble Wrap Art, cut a piece of bubble wrap the same size as the paper you'll be using.  Then have the kid's paint the bubble wrap. 


Notice the blue on my table?  That's a shower curtain from the Dollar Tree...also found that tip on Pinterest (I believe).  Works great for a no mess painting session and I don't have to go scrounging around for newspaper.  It just stays in our paint basket with all the painting supplies.


After the bubble wrap is completely painted, lay it on the paper and press down all around the bubble wrap.


Then pull it up and voila, you have a beautiful piece of art work.  You can make several "prints" before painting again.  The bubble wrap can also be washed with soap and water to be reused for another project :)


For a picture of the finished product, visit the website where I initially saw the idea.

Molly


Monday, June 4, 2012

Makeover Monday: A Jeweled-up Onesie

I buy all my older daughter's clothes second hand from a woman I met at a yard sale who has fabulous taste and has a very stylish daughter who is a year older than mine.  This summer, one of her "new" outfits came with an adorable Gap tank covered in printed-on necklaces.  It is my favorite of her summer shirts. 

I've seen many little onsies out there for boys with bow ties and regular ties and wondered what their girly counterpart might be.  When I saw my daughter's new tank top, I knew I wanted to make a similar onsie for my baby girl.  So, I went to Target, bought a pack of fabric markers ($5) which can be used for several projects and started drawing on one of her many plain white onsies.  Here's the finished product.  Not as spectacular as I would like it to look but she's received many compliments, so I guess it can't be that bad :)  I might try another one in a bigger size and see if I can do better next time. 

Without further ado, the Jeweled-up Onsie:


And, here they are in their matching outfits.  My older daughter loves to be "twins!"


Getting Fancy,
Molly